Tuesday, July 26, 2011

Mason Jar Soap Dispenser

**We now have an improved version of our mason jar soap dispensers available on Etsy and a post about them here!**

I finally made my mason jar soap dispensers!  This project has been on my to do list for quite a while!


First, I found a couple canning jars at the thrift store in two different sizes that would work as hand soap dispensers for the bathroom and kitchen.  I've seen a few blogs where they painted their mason jars so I thought I would give it a try.  I chose a basic glossy white spray paint and sprayed it to the outside of the jars.

I then took a nail and hammered it into the center of the jars' lids to start a hole.  I used needle nose pliers to pull the tin back enough to fit the soap dispenser pump.  Here you can see the lid after I made a big enough hole for the pump.  (I also used the hammer to flatten out the sharp edges on the underside of the lid for safety.)


I then used a hot glue gun to glue my pump into place on the lid.


At this point I spray painted the lid and pump to match and then screwed the lid onto my mason jars.

I used an oil-rubbed bronze spray paint on the lid and pump for the kitchen to match the faucet I hope to one day have :o)


And a satin nickel on the pump and lid for the bathroom to match the fixtures in there.


One problem I did run across was the paint on the movable part of the pump is not a good idea as you can see here:


The paint will rub-off.  I'm still trying to think of a fix but the best idea is to just not paint here.  If you can find a pump in the color you want and then just paint the jar lid to match I think that would be your best bet.

As for me, I'll just have to live with the peeling paint unless I can find a remedy.  But I still think the dispensers are really cute!

Linking up with Young House Love and Bower Power

Thursday, July 14, 2011

Tissue-Paper Flowers

A while back I saw a tutorial on how to make tissue-paper flowers at Folding Trees.  I thought some sort of craft flower would look better than my silk flowers.  So last night for craft night my friend Genevieve and I decided to give them a try.

I think they turned out pretty well. We basically followed the steps from the website except Genevieve came up with the idea to make scalloped edges.  I think the scalloped edges made a big difference in the overall appearance.  They ended up looking like peonies to me, my new favorite flower of the moment!  So here are a few pictures.

The following arrangement I put on the coral-colored cabinet from last week, which fittingly, the paint color was called "peony".


I love how these flowers look:


I went a little tissue-paper happy and also made a couple for a small bud vase in our bedroom:


And a large cream-colored flower with a couple fuchsia ones for the living room:


I told you I went tissue-paper flower crazy but they were so fun to make!

Saturday, July 9, 2011

Old Silverware as Plant Markers

Browsing on Etsy I came across some neat plant markers made from old silverware.  I thought this might be something fun to try so I bought a small set of metal punch letters on Ebay and then some old silverware from local thrift stores.

First I used a hammer to flatten out the silverware.


Then I used my metal punches to spell out the name of one of the herbs I have.  My punching skills aren't perfect, it's somewhat difficult (at least for me!) to hit repeatedly in the same spot to get a deep enough letter.


Then using a hint from Cut out and Keep I used a black sharpie to fill in the letters. 


I then used my homemade vinegar spray cleanser to wipe the sharpie ink from the non-punched surface.  This took quite a bit of buffing.  (You can also use sand paper or fine steel wool but it will leave fine scratches on the surface of the utensil.)

And here is the finished product!


And a few more I made:


You can even use the handle of a fork as I did for my mint.


 Adding a bit of whimsy to the herb garden!


Linking up with Young House Love

Wednesday, July 6, 2011

From Drab to Fab!

I finally got to do what I love best, paint furniture!  A few weeks back I found a small two-drawer cabinet at the thrift store.  It was originally $10 but it was 50% off day so I got it for $5!

 
Although it was a bit grungy it had good bones.  I really liked the design especially the cute pearl-like detailing around the drawers.


Most of the detailing on both the sides of the cabinet were broken off so I decided to remove what remained and leave the sides plain.


Here I am with a chisel and hammer to chip the remaining detail off the sides.  We have smaller chisels but for some reason I thought this was a job for our gigantic chisel??


After removing the side detailing I used a nail set to knock the remaining nails below the surface of the wood.


I used wood filler to fill in the nail holes and any dents in the wood.  I then did a quick sanding to smooth out the wood filler, old glue, and to rough up the surface of the wood before priming.

I then applied two coats of Martha Stewart paint in "Peony".  I also painted the cabinet hardware with spray paint in "oil-rubbed bronze".

And here it is our fabulous new cabinet!


And look at the detailing!  Isn't it cute!


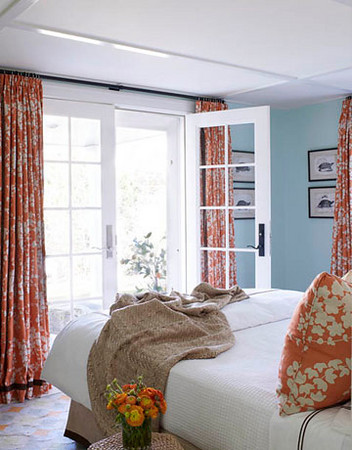
It found a home in our front bedroom.  I'm planning on incorporating some coral colored-items to go with the light blue for a beachy/ocean type vibe.

For a look something like this:

color combos - orange
spaces design

 
by John Wiley featured in House Beautiful. Photo credit: Ngoc Minh Ngo 

 My cabinet is a little more on the pink side but I wanted more of a coral color than orange to match some fabric I plan to make a pillow from.


So that's the plan for the front bedroom.   Woohoo for furniture painting!


Sharing at:

Creations by Kara
Transformation Thursday IhookedupwithHoHlamespice Furniture Feature Fridays The Shabby Nest